| The PNG Guide is an eBook based on Greg Roelofs' book, originally published by O'Reilly. |

|

Home  An Introduction to PNG An Introduction to PNG  Case Study of a PNG-Supporting Image Editor Case Study of a PNG-Supporting Image Editor  Invoking PNG Features in Fireworks Invoking PNG Features in Fireworks |
|||||


|
|||||
|
Invoking PNG Features in FireworksBecause Fireworks's internal format is 32-bit (i.e., truecolor plus a full alpha channel), working with transparency is as easy as opening an image and applying the Eraser tool to its background. For example, suppose you have a photograph of someone and want to focus on the face by making everything else transparent, leaving behind an oval (or at least roundish) portrait shot with a soft border. There are several ways to accomplish this, but the following prescription is one of the simplest:
Note that the Lasso tool's feathering radius is subtly different from that available via the Select menu. The latter is a smoothing factor for the Lasso's boundaries/; in this example, with an inverted selection so that the image's rectangular boundary is also lassoed, changing the value through the menu will round off the corners of the dashed Lasso boundary and may merge separated parts of it together. The feathering radius on the Tool Options pop-up affects only the width of the partially transparent region generated along the Lasso's boundary. In any case, that's all there is to creating an image with transparency. The next step is to save it as a PNG file. As I just noted, the Save and Save As... menu items save the complete Fireworks ``project,'' retaining information about the objects in the image and the steps used to create them, at a considerable cost in file size. It is generally worthwhile to save a copy that way in case further editing is needed later. But for publishing the image on the Web, it must be exported, and this is where it can be converted into a palette-based image with or without transparency--or left as a 32-bit RGBA image, but without all of the extra editing information included. First let's consider the case of exporting the image as a full RGBA file. Here are the available options in the Export dialog box:
Fireworks 1.0 provides no option to interlace the image, so the preceding steps represent the complete list of possibilities for this case. Things get more interesting when it comes to palette-based (or indexed-color) images. Then one has the option of choosing either single-color transparency or the nicer RGBA-palette transparency, in addition to a number of other palette-related options. Here are the options for the RGBA-palette case:
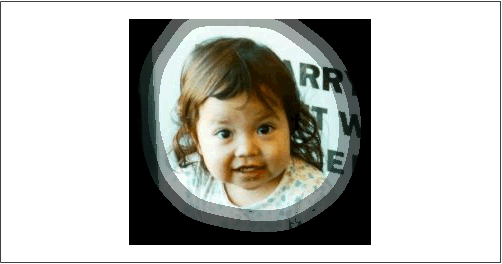
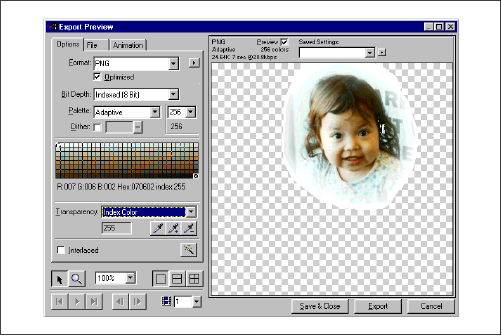
Note that the effects of the current options are reflected in the preview image to the right (as in Figure 1-5), which shows a limitation in Macromedia's original implementation of RGBA-palette mode. In particular, only four levels of alpha are used, two of which are either complete transparency or complete opacity (the other two represent one-third and two-thirds transparency), which results in very noticeable banding effects in Figure 1-6.
The four-level approach works quite well for anti-aliasing (that is, preventing ``jaggies'' on curved elements such as circles or text), which effectively involves a one-pixel-wide band of variable transparency lying between regions of complete transparency and complete opacity. But the previous example uses a 25-pixel-wide feathering radius, and the two partial-transparency bands both show up extremely well and have sharply defined edges even if dithering is turned on. Unfortunately, that rather defeats the purpose of alpha transparency in this case; the 32-bit version is the only alternative. Fortunately this was one of the areas that got fixed in version 2.0, and judging by one test image, the results are spectacular. Very nearly the same procedure works if you want to save the image with single-color, GIF-like transparency; instead of picking Alpha Channel from the list of options in the Transparency pull-down box, this time pick Index Color. Doing so once will allocate a single palette entry, not used elsewhere in the image, to act as the fully transparent color. A strange feature of version 1.0 is that the Transparency pull-down will still indicate Alpha Channel the first time Index Color is chosen. Choosing it again will cause it to ``stick,'' but at a cost: the entry chosen for transparency, which generally seems to be the last one (usually black), may now be used in the opaque parts of the image as well as the transparent regions. It is not clear whether this is a bug or an intentional feature of some sort, but it is fully reproducible. Figure 1-7 shows an example.
As with transparent GIFs, single-color PNG transparency requires that the image be displayed against a suitable background color--white, in our example--to look good. The opposite case, displaying against black, is shown in Figure 1-8.
|
|||||
Home  An Introduction to PNG An Introduction to PNG  Case Study of a PNG-Supporting Image Editor Case Study of a PNG-Supporting Image Editor  Invoking PNG Features in Fireworks Invoking PNG Features in Fireworks |
|||||
Last Update: 2010-Nov-26


